
DIY Play Tents for our New Year’s Eve campout!
How to make these easy DIY play tents that your kids will love!

We already have a few New Year’s Eve traditions in our house for the kids like- we order sushi takeout and do chocolate fondue for dessert! It’s always a fun, low key night and the kids love it! This year I wanted to add a new activity in that willhopefully become a fun tradition for us. We are going to a family “camp out” in our living room, play games, make smores, do fondue and eventually when they are older, stay up to watch the ball drop. With our new tradition I decided to do little DIY tents for each of the kids. All the steps for how I made these little cutie tents are listed below! Materials list is at the very end.

1. For each tent we used 2 peices of wood that measured 1 inch, by 2 inches, by 8 feet. I cut them in half leaving us with 4 peices of 4 foot wood.
(this will be the frame)

2. Next I drilled a hole in each end of the 4 peices of wood, so 8 holes in total. This is where the dowels will go to connect your frame.

3. Insert a dowel into the holes, criss- crossing the top peices of wood to create the tent shape

This is what the base/frame will look like without the fabric

4. Measure from one hole to the other. This number, times 2, will be the total measurement for your fabric. My measurement was 43 inches, so my fabric needed to be 86 inches in total.

5. Measure your fabric. I used old curtains we had lying around. Reusing what we had to keep this a cheapo-depot DIY.

6. Fold over the edge, to make a pocket for the dowel.

7. I used a hot glue gun (again, lol) along edge and fed the dowel through the pocket. Repeat on other side of fabric.

The 2 dowels with the arrows are the ones you feed through your fabric

This top dowel is where your fabric gets draped over to create the tent shape.

That’s it! Then you can style them up as cute as you want!

Since our play tents were for a campout I made them sleepover ready. The kids got these blow up mattresses from Santa so they were perfect to slide into each tent.

I used sheets our kids already have for their beds, added fluffy pillows, their homemade blankets from their great grandma and their hydroflasks (also a Christmas gift).

The hats/flowers were just a little personalizwed touch so each kiddo had their own special spot

The hats/flowers were just a little personalizwed touch so each kiddo had their own special spot

The hats/flowers were just a little personalizwed touch so each kiddo had their own special spot

The kids are sooo excited for our camp out and I’m excited to have a new fun tradition to carry on with the kids!
Materials list:
2 peices of wood measuring 8 feet by 2 inches, by 1 inch
3 dowels measuring 4 feet long (thickness is up to you, but the thicker the dowel is the sturdier the tent will be
8 foot peice of fabric (old curtains or sheets work perfectly!)
Mattresses (amazon) they are really optional but are soo cute and can be used again for sleepovers, family trips etc.
Happy New Year -xoxo TT

Favorite Holiday Treats
Tonight we are hosting our cookie baking and decorating party, because Santa and his reindeer need their treats on Christmas Eve, and Mommy needs to get all the Christmas Eve baking done since we host our family here. This is our 5th year doing cookie decorating and baking so I thought it would be a good idea to round up all our favorite recipes in one spot! These are the cookies the kids make for santa and all the sweets we make for Christmas Eve. The tried and true recipes that everyone loves so much we never have leftovers on Christmas Day.
First up: The Cookies for Santa Recipe- I mean thats what the whole night is about!

This is the recipe we use for the kids decorating cookies! It’s perfect for this activity, because they taste delicious and they aren’t super soft like some sugar cookies can be. It helps when decorating if the cookie is a little firmer. It’s easier to frost and put all kinds of goodies on. Plus- she offers this adorable little free printable. I print it and put it on our cookbook stand every holiday season. Check it out on her website: NWG Sugar Cookie Recipe
Next up: Greek Christmas Cookies (kourabiedes)

I’m half Greek and we ALWAYS had these cookies around at Christmas so I wanted to pass down that tradition to my kiddos (who are a quarter Greel, lol)! They are crumbly butter almond cookies coated in powdered sugar and they are DEEEELISH! They look like little snowballs and add to the Christmas fun. This recipe from Cooking for Keeps is the best recipe I’ve found -beside my Yiayia’s :-) Greek Christmas Cookies

These crinkle cookies are by far the most popular sweet we have on Christmas. I usually triple the recipe and only end up with a handful leftover the next day. Crinkle cookies are a little different in that you need to make the dough beforehand and let it set over night before baking, so keep that in mind when planning your holiday baking schedule. This recipe from Collecting Memories is the best for this type of cookie. I only make one adjustment: instead of vanilla extract I put almond extract and I double the amount. It makes for a rich nutty flavored cookie that everyone looooves!
Happy Baking!

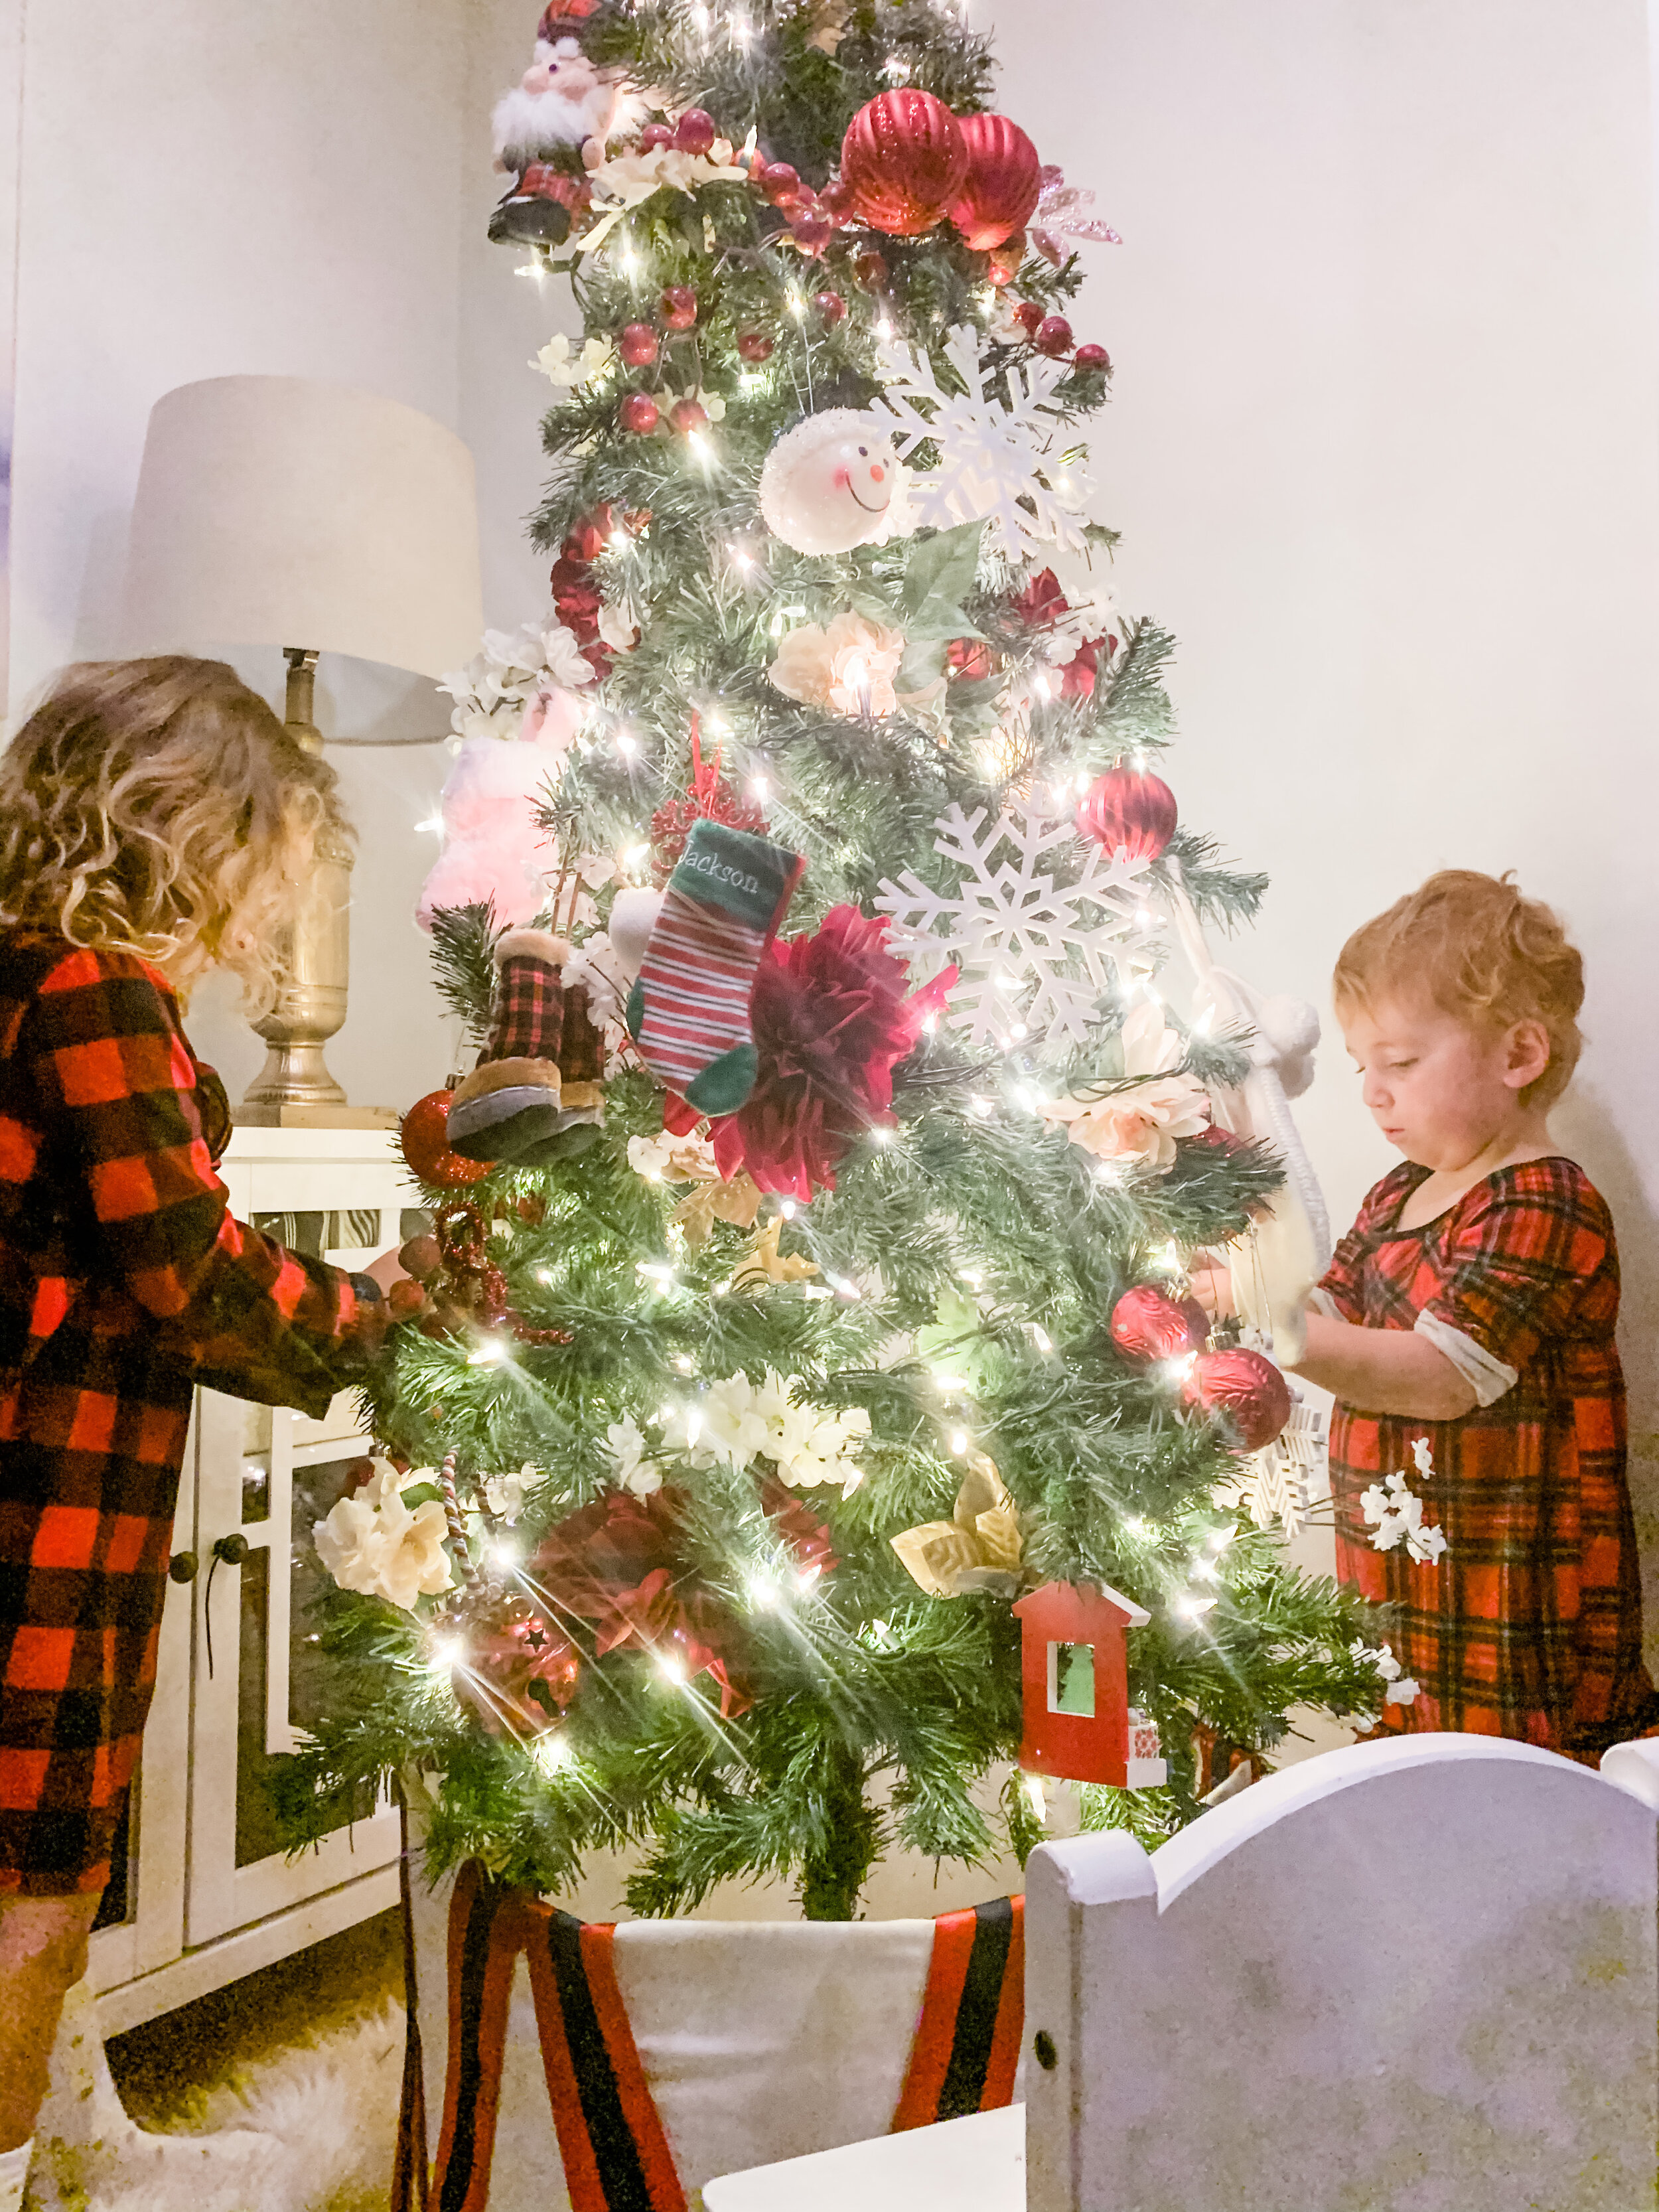
DIY Tree Collar
DIY tree collar made from everyday items for free!!
Made from all our leftover Christmas decor!

We already have 3 trees with tree collars in our main living area so I didn’t want to spend another $40 for the kids Christmas tree in our downstairs so I decided to make one out of an extra Amazon box (lord knows we have a bajillion of those lying aruond this time of year) some scrap fabric, but wrapping paper would work just as good as long as it was thick enough to not see the hbox through it, some leftover ribbon and my glue gun! Steps and pictures listed below


Step 1: Measure your tree base and cut the box to the right height and width

Step 2: Wrap your box with the fabric- just like a present! If you’re using fabric, a hot glue gun will probably work best. If you’re using wrapping paper normal tape should be fine!

Step 3: Lay out your ribbon pattern and get gluing! I was trying to make mine look like a Christmas drum, lol! Fun fact: little drummer boy is my favorite Christmas song.

Step 4: Layer on any extras. I doubled up the ribbon and added pompoms in the peaks. I would have like to add a little gold to it to make it more Christmasy/festive but we didn’t have any on hand and this was a ZERO dollar project. No new dollars being spent.

Then let the kids decorate their tree (however they want…. ahh!)


Happy Crafting!!
Images edited by: Aubrey Elle Photography

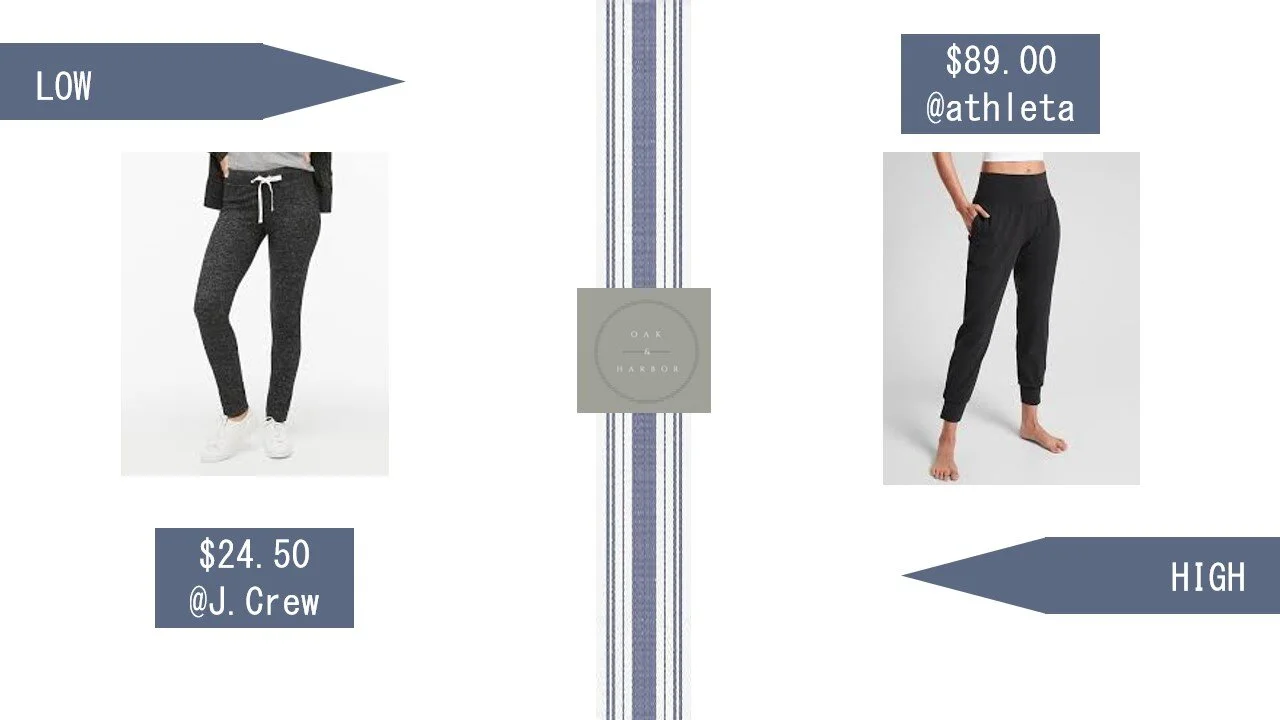
Style for WAY less
High end home decor and fashion on a budget
Nothing in my house costs a lot of money! NOTHING! I have a 4 year old and 2.5 year old twins. They can and WILL destroy everything, whether its on purpose or not, so at this stage of our home life I dont think its wise to invest in super expensive pieces of furniture (or clothing). I’ve rounded up just a few of my favorite high/low look alikes for clothing and furniture so you can be stylish while on a budget too.

You can barely tell these 2 apart in looks! I own BOTH versions and so far you can’t tell them apart in quality either!


I have the “low” version from Walmart and my sister in low has the “high” version from Serena & Lily and you would never be able to tell the difference. Bonus points for ones with little kids- they are plastic and wipe clean SO easily. Goodbye messy dinner stains!


I have the J. Crew joggers on right now as I type this blog post. They are soooo comfortable and soft, but not thin and cheap feeling. For $24.50 you could buy 3 of these for the price of ONE athleta pair.

I’m in the process of replacing our family room curtain rods (8 windows worth!) so I will not be spending $80 a window. We’ve have target curtain rods plenty of times before and the quality is always great. Sticking with those for sure!


Christmas Wrapping Round-Up
Christmas wrapping paper styles to coordinate with your tree and decor

It’s finally December and I’m ready for the holidays full swing!! Since I spend so much time making our Christmas trees look perfect I CANNOT have ugly presents underneath my tree. It will drive me insane. I’ve rounded up a few of my favorite wrapping looks with links for where to get the items. A few tips before you get started shopping:
Places to look for good deals first:
Home Goods, TJ Maxx and Marshalls always have an amazing assortment of wrapping papers
Target’s “sugar paper” line is a big favorite of mine
Dollar tree has large rolls of brown kraft paper for $1. I keep this stocked ALL the time. It canbe used for any presents
Michaels always has plain white wrapping paper stocked even when its not the holidays
Always get a few solids
I like to mix in white with pretty much every style. It always goes and gives a break from the “christmas explosion” under the tree
Get solids that go with your color scheme for the year
Mix prints!
I like to get a few rolls of a big/bold print and a few rolls with a smaller, more detailed print so they aren’t all loud and competing
Ribbon! Ribbon! Ribbon!
I like to get a lot of wide ribbon (like 2 inches at least) that has a texture or print to use as a base
Get thinner ribbon in a coordinating color scheme in either a print or texture. Then you can layer ribbons on top of each to make a more finished look.
If you use a solid ribbon as a base, use a printed one on top

I like for my wrapping and ribbon to coordinate with my tree and holiday decor for the year. It ties it everything together and makes a cohesive look. Since my trees are “coastal/prep” look this year, I’m planning the same look for the presents. I like to do a couple solid papers, a couple printed (usually one smallprint and one large print) with different types of ribbon.
Where to get the look:

A natural looking gift wrap works for pretty much any holiday/gift giving time since it doesnt scream “Christmas time”
Where to get the look:
Greenery: any extra picks or stigs from your tree look great tucked in to ribbon with this look
Kraft paper (dollar tree) I use this ALLL the time.

Traditional is probably the easiest type of wrapping paper and ribbon to come by! I still like to use a couple solids and a couple prints, with adding textured ribbons (velvet is my favborite) to give it a luxe feel.
Where to get the look:
Always check Marshalls, TJ Maxx, and HomeGoods first for this type of wrapping paper. They have a ton of tradition colors always and the prices can’t be beat for quality, thick wrapping paper.

Glam christmas wrapping reminds of New Years Eve and “The Great Gatsby”. Very art deco and fancy. Think golds and blacks with rich textures (velvet again lol!)
Where to get the look:
Happy Wrapping!!

Small Businesses to Support
Small businesses in MA and further to support this holiday season- and every other season!

It’s not Small Business Saturday anymore but they definitelt still need your support this holiday season! I’ve rounded up some of my favorites.

Can’t get on here and talk about small businesses without plugging my hubby who is an amazing builder!
Make sure to check out his instragram: @j.r.trubia_construction

I’ve been in love with House of Golightly for years and I finally found a spot for one of her prints in my house! It’s in our girls room and adds to the rooms modern traditional vibe (if that even makes sense) :-)
etsy: Lisa Golightly, instagram: @houseofgolightly

Aubrey is an amazing photographer on the South Shore who is the sweetest person ever. She will make you feel so comfortable and have your pictures turn out amazing!
Instagram: @aubreyellephotography

Spruced Furniture Refinishing is a small business run by an awesome mom of two boys! She takes drab, out of date, old furniture and makes it new and fresh again! see for yourself
Facebook: Spruced Furniture Refinishing

Check out Linds Loves Ink and her custom caligaraphy letters to santa! Such a special treat for a little believer to recieve.
Instagram: @Lindslovesink

Lindsey also does custom watercolor house prints. Perfect for Christmas gifts
@Lindslovesink

Have to add in my super talented brother-in-law as well. Him and my husband have been building houses together 20 years. They are the best!
check out his instagram too: @trubia_construction

Crystal W Design is an Indie Textile Designer that creates amazing prints. She works with Society 6 so any print you like of hers can be made into pretty much anything! We have pillows but the print came in shower curtains, rugs, mousepads, etc!

Thanksgiving Day Activities
Thanksgiving is basically all about eating but it’s a longggg day waiting for the food especially if you eat later and/or have kids to keep occupied. To top it off, it was bad weather this year so the kids couldn’t even play outside since it rained ALLLL day. I rounded up a list of activities we did this year for adults and kiddos, plus some good ones I plan to try for the next family holiday or next Thanksgiving. Hopefully next year the parade will be back to normal which is always fun to watch with kids.
Activity 1:
Pin the hat on the turkey. I made a turkey out of construction paper ahead of time. I also cut out blank hats for the kids to decorate. Once they were done we did Pin the Hat on the Turkey, just like pin the tail on the donkey. It was like 2 activities in one since the kids loved decorating the hats too!


Activity 2:
Family Bingo. I made a Bingo board on Kraft paper and filled the squares with funny inside jokes or sayings that always happen at our family gatherings (Ex: a kid cries, an adult cries, something gets broken, etc). Put a dot on each square once it happens. Once you get a row of bingo you can do a prize (we took a drink, lol) until the whole board is completely full.

Activity 3:
Treasure Hunt! The kids loveeddd this one. I printed out a scavenger hunt from The Housewide Modern. She gives you 16 riddles and then a printable with blank spots so you can make your own treasure hunt stops.
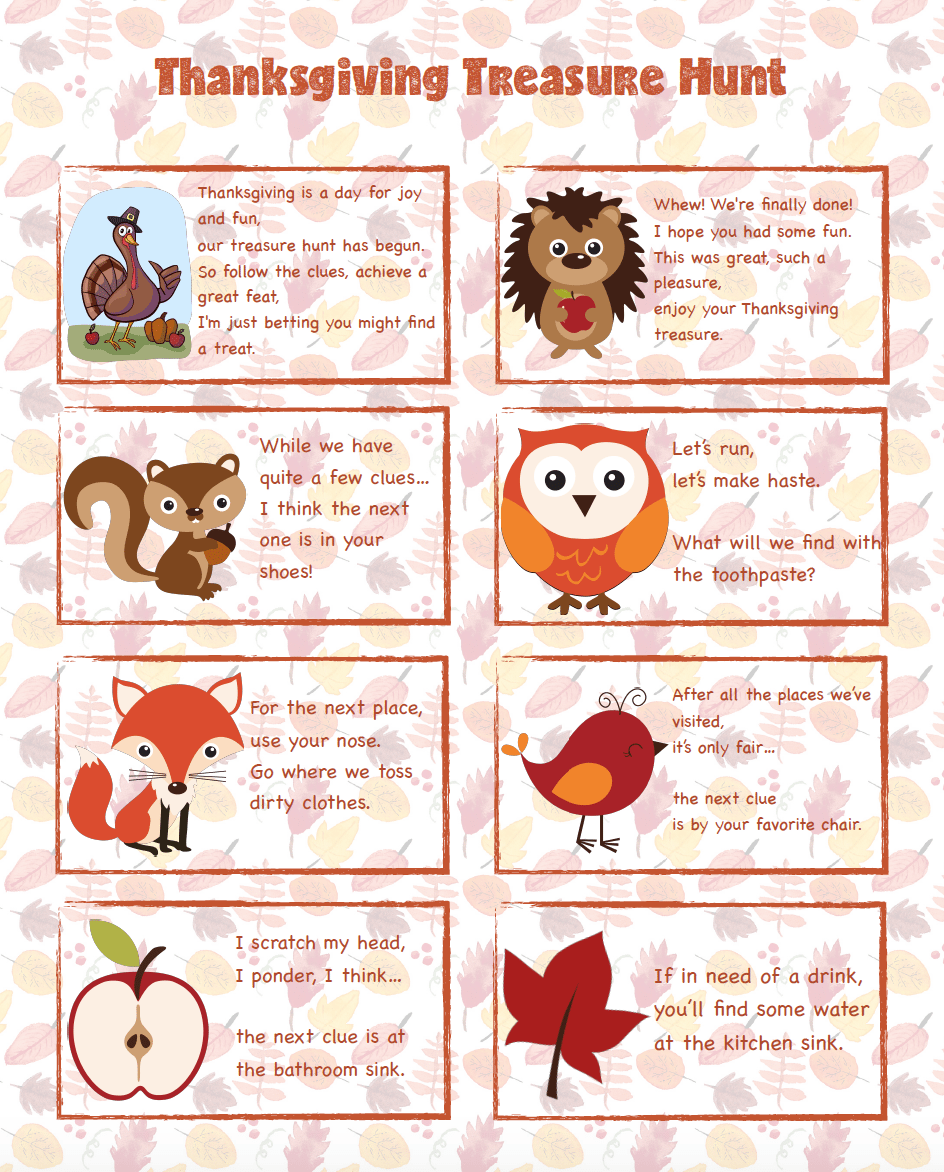
Other Thanksgiving Day Activities To Try:

Color your Thanksgiving dinner meal!

Make fall trees with stickers and paper bags

A good use for all those extra bags you have leftover after shopping for the big day.

Assemble pre-cut out scarecrows

E-Design Budget Bedroom Makeover
E-Design budget makeover on your timeline

Everyone can use some design help or inspiration at some point! In comes -> Oak & Harbor. I basically, eat, sleep and breath home decor and styling, so I have plenty of fresh ideas on the brain ready to help! A colleague had sent me some pictures of what style bedroom she wanted… and the bedroom she actually had. I’ll walk you through the steps I took to help plan her bedxroom via an E-Design mock up.
E-Design can be great for a lot of people. Maybe you don’t have the time to design the room, or your not sure how to bring the styles you like together in one room, but you don’t have the budget to drop hundreds (if not thousands) on a designer and all new furniture/decor all at once. With my E-design mock up I do all the heavy lifting for you. Compile a design plan for your room, based off your own specific likes, then provide you with links in your price range to recreate the look on your own timeline.
Below are the “Before” pictures of this particular design. She likes a modern, warm, slightly bohemian california style, from the inspiration pics she sent me, but was not acheiving that in this bedroom.


Design Plan


Her bedroom furniture set was brand new so she wanted to work that into the new bedroom plan. This is what we came up with. Ive listed all the items I picked with links below.

The main part of any bedroom is THE BED! Make it a focal point and somewhere you just want to fall into! I started with this linen striped duvet (link below). I like to keep a duvet folded at the foot of the bed to add extra fluffiness and its perfect to pull up over you on an ectra cold night.

A must have for any fluffy bed is a good base comforter, down quilt, or coverlet. This would be perfect layered under her new duvet. Link below

Every bed needs somde euro pillows as a backdrop. For her King size bed I recommend 3 across the back. I like to use a plain white sham as it allows you to bring in pattern in other parts of the bed (throw pillows, blankets, etc). Link from H&M below

These crisp white curtains would help tie in to the white bedding (euro shams, comforter) whereas the navy blue ones didnt really go with any other elements in the room. I suggested she moved her bed to the opposite wall so it wasn’t in front of the window, but if she isn’t able to do that, painting the walls white and adding these simple white curtains will help make the window placement blend better. Also, the curtain rod needs to be hung a little higher. Link below

I’ve been dying to use these benches in a design! They were sold out for months because they are so versatile and would fit in pretty much any home in any room. They are perfect as “nightstands” in this narrow bedroom. The striped pattern works well with the duvet and the rope/medal legs give it a touch of bohemian cool that she was loving in her inspiration pictures. Plus I love to add a little black into every room. This contrasting stripe is just enough!

Art is always one of my favorite thigns to pick out in a room. It can completely change a space. The exact one I picked for her is no longer available for me to link, but this one from etsy has a similar organic type feel with muted colors and a wood framed canvas that would blend with the other decor beautifully.

Add in a rug with a subtle color and pattern. This isnt the exact rug I linked for her, as its not sold anymore, but again this one is similar and ties in the colors from the artwork.

Added this blackmedal frame mirror for above her bureau. It’s sleek to add to that modern cool vibe she likes and it doesn’t take up a lot of space (since they don’t have a ton to spare)

Need to add in a little table lamp- this one has a nice natural vibe

A black and white nautical print (a nod to our seaside little town)
Ways for you to contact me for all your e-design questions:
tiamaria353@gmail.com
through the Oak and Harbor website
through the Oak and Harbor instagram

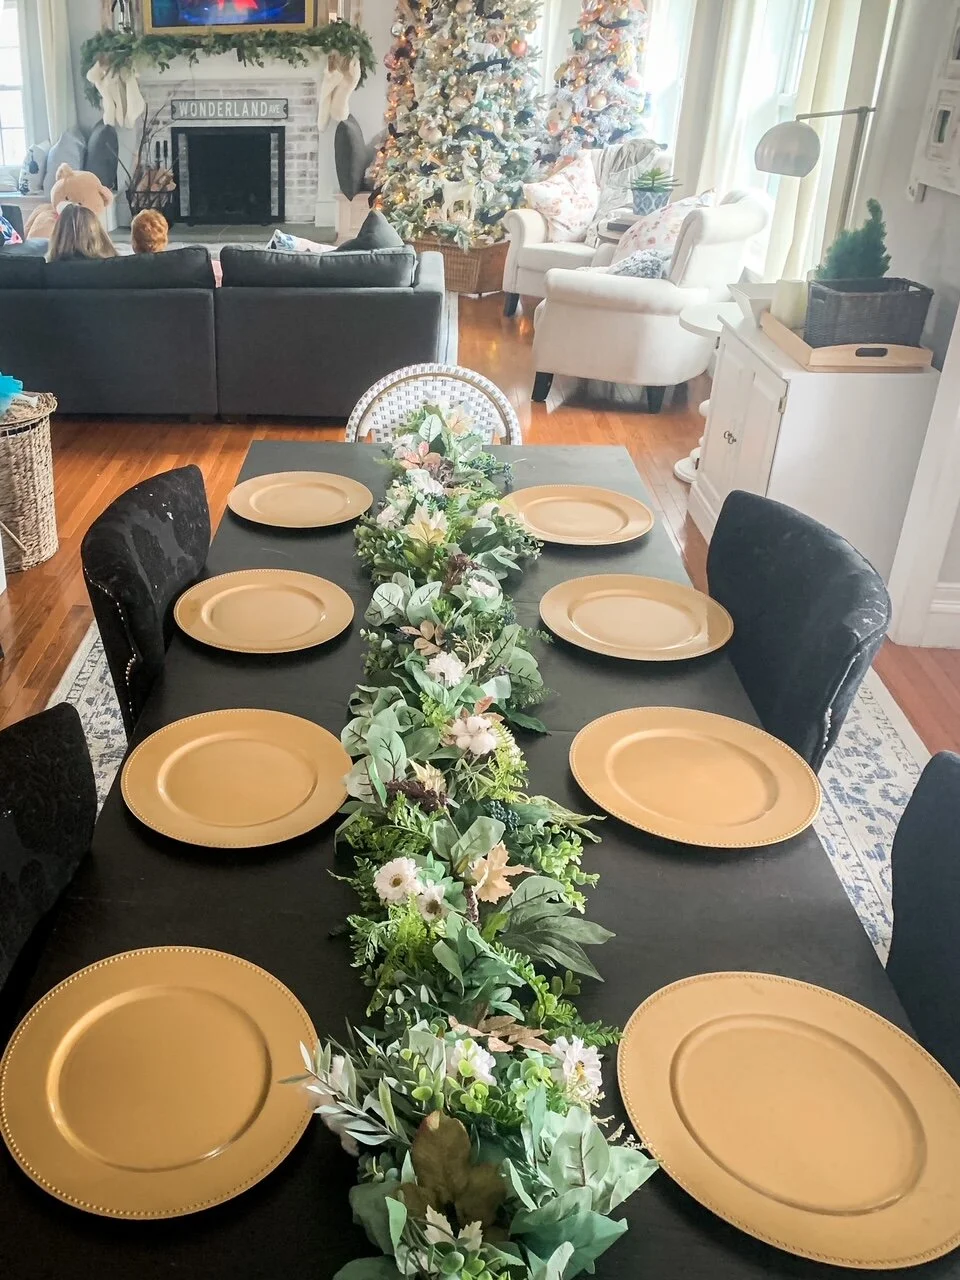
DIY Thanksgiving Tablescapes
Thanksgiving table scapes for cheap or free! DIY

The rest of my house might be decorated for Christmas, but Thanksgiving still needs some love! I made a couple easy DIY tablescapes for our Thanksgiving this year and added the steps to recreate them below:
Step 1: Gather all your greenery. These were all leftover peices we had from other projects, parties, etc. If you wanted to purchase any fall florals right before thanksgiving is the time. Everything is 80% off. They basically give it away.

Step 2: Measure your table and plan to give a foot of space on both ends. Add your first string of greenery in an S pattern. I stapled mine right on to a scrap peice of wood we had lying around.

Step 3: Add in a second string of greenery in an S pattern going the opposite direction. I weaved mine over and under the first one.


Step 4: Add in extra leaves. I used ones that had fallen off old florals we had and from the stems on our Christmas tree.

Step 5: Add in flowers (if you have them). This part isnt necessary since centerpeices sometimes consist of only different types of greenery, but I found a lot of extra flowers so I threw ‘em on there. Why not? I added them in where I thought the leaves looked less full or you could see some of the wood base.

VOILA!


Kids Thanksgiving Table Decor

The kids table needs a little love too!

Zero dollar kids table made from Kraft paper we had and some permanent marker!

all pictures taken and edited by: Aubrey Elle Photography

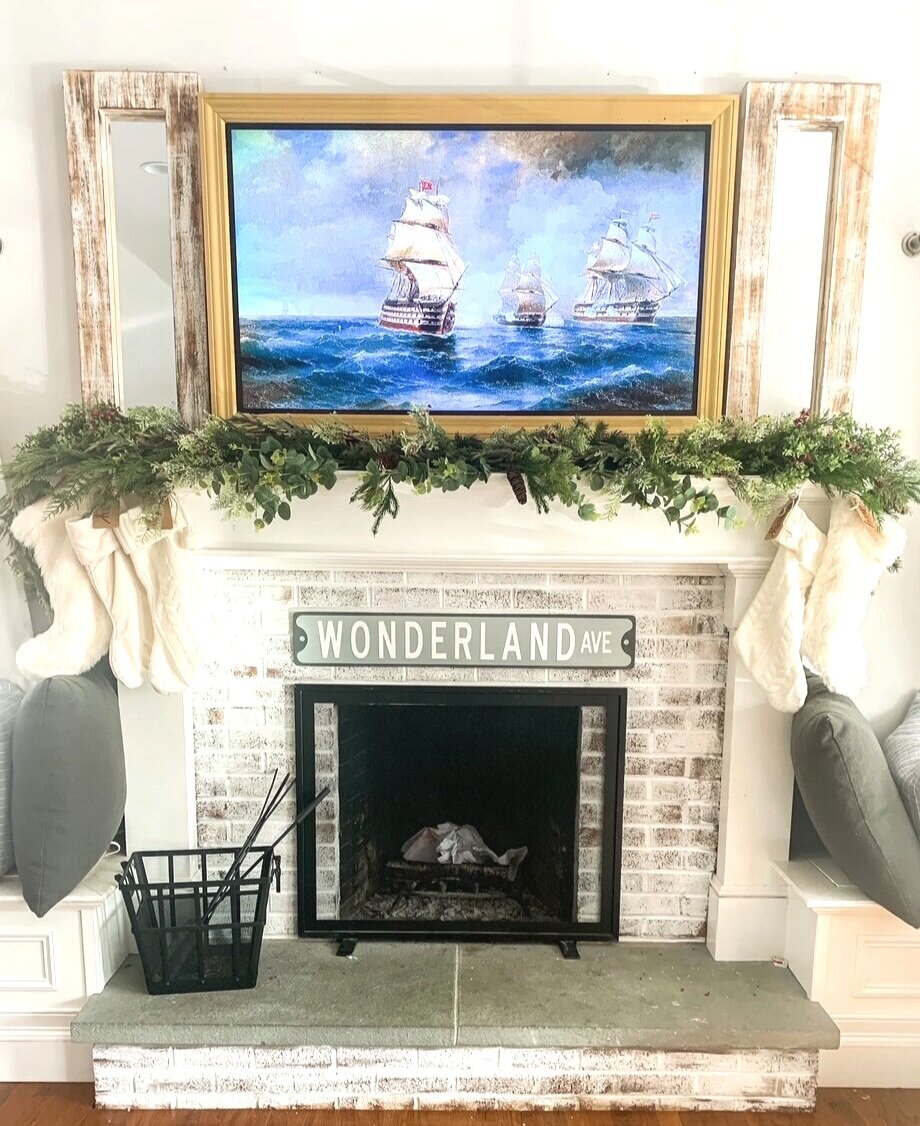
Christmas Tree Decorating Tips
Tips for getting your Christmas trees to look like a department store display!

I am a Christmas CRAZY person! Luckily for you, that’s helped me perfect my tree decorating skills over the years. I’ve had my share of bad Christmas trees (hello our first apartment in 2009), but now I’ve got it down to a science so it makes it easier (and more fun) to decorate them each year. Below is a list of my general tips! I’ve also linked my Christmas Tree Shopping Guide post below so you can see what I look for before I even start on the trees.
Start with your largest non traditional ornament items first. Here’s a quick iphone picture of what I used this year (figurines like deer, owls, nutcrackers, signs with Christmas sayings, holiday bells, etc)

Step 2: Add in your LARGEST traditional ornaments next. Make sure you tuck them IN the branches, not just hanging them off the edge. The biggest ones being tucked deeper into the tree help add more dimension. Since they are so large they also help to hide any bare spots in the tree to make it look fuller.

Step 3: Add in the medium sized ornaments. I try to go in a zig zag pattern to make sure they all get evenly spaced out. Make sure to also tuck some of this size ornaments in the tree too, not just hanging off the edges.

Step 4: Florals. Add in florals like long leafy stems stems, roses, berries, etc. This adds to the fullness.
Step 5: Add in Ribbon! I like to cut mine at arm’s length and weave them in and out of the branches instead of just wrapping it straight around. It uses less ribbon and makes the tree look fuller instead of a big green present tied up. I also like to use ribbons with a pattern or texture. It layers in another element to the tree.

VOILA!


pictures taken/edited by: Aubrey Elle Photography

Christmas Tree Decor
What to get to decorate your Christmas tree
Shopping Guide
Before you start to decorate the tree you need to have ALL the goodies to make it look pretty! This is my design plan for this years tree! It’s great to have a general idea before you start shopping/decorating because once you’re at the store and it’s Christmas explosion in there it will be overwhelming!
Below I’ll share what I look for when shopping for Christmas tree decorations :-)
This year I’m leaning more towards a preppy blue and white Christmas instead of just the tradtional red and green I’ve been doing the last couple years. It’s fun to switch it up to keep things feeling fresh.
Shopping tips:
Get allllll different sizes of ornaments. Do not forget the LARGE ones. A lot of people skip that size but it realy helps to fill up the tree without it looking like there are a million little shiny balls all over it.

2. Think outside the “ornament” box! I like to find figurines, nutcrackers, christmas bells, signs etc that go with my color scheme. They look great nestled in the branches :-)

3. Florals- I like to grab Christmas floral or greenery stems to add to the tree. It gives the tree fullness without adding even more ornaments. It’s also a great way to help tie your tree into other parts of your house since you can use stems from your mantle or wreath decor. Pampas grass is having a minute right now and would be a great trendy additiont to any tree.

4. Ribbon- I like to add wide ribbon to my trees to give in an extra texture. It’s also another way to tie your tree into other Christmas decor because you can use it on when wrapping! Here’s some of my favorites

Stay tuned for how I use all these goodies to fill up my 3 Christmas trees :-)

Mantle Garland How To
Making your mantle garland look full and lush instead of blah
Make it look lushhhhhhhhh

How to make your mantle garland look full and lush in a few easy steps:
Go shopping!! That’s always a fun part! When you’re first starting out at the craft store it can be overwhelming so this is what I look for:
A long plain garland (this will act as the base)
Another long plain garland in a complimenting color or texture (i.e. if the first one is dark green, go for a flocked one next)
Multiple floral picks— have fun here! Get different colors, textures, florals, greenery, berries etc
Ribbon- I’m very into velvet for Christmas but use whatever strikes your fancy
OVER BUY! You can always return what you don’t use.
Start with a long base garland. This kind doesn’t have to be expensive since its the base layer. I like to keep it as close to the edge of the mantle as possible to get even more fullness.
Layer on your complimentary garland. I usually weave it in out and of the first one to give it movement and not make it look like 2 straight lines.
Add all your floral picks into the base layers using floral wire. This is where the magic really happens. It takes the simple string garland from plain to gorgeous. Keep adding layers using different stems. Keep taking a step back to make sure you like how its coming together
Add ribbon!


Halloween 2020 Family Costume- Schitt’s Creek
Just fold it in, David! Our DIY family halloween costume in honor of our favorite TV show- Schitt’s creek! Ew, David!
Just fold it in, David!
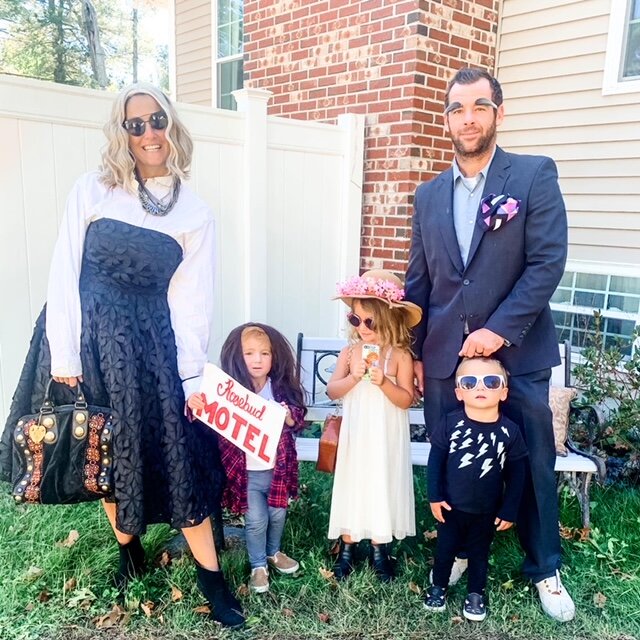
We turned our house on Oak Street into the Rosebud Motel, just in time for Halloween 2020!
Schitt’s Creek is one of my husband and I’s favorite shows to watch together so it was so fun to make this costume for us! This one was really for us adults, lol! Almost all of the costumes were made from stuff we already had on hand, but I’ll list how we pulled each character together below!


First up: Moira Rose- The black dress I wore was actually the bridesmaids dress from my own wedding! Wild! Happy to get another wear out of it. I layered it over my husbands white button down shirt, threw on black ankle booties and all the goddie necklackes I could find. I could not be Moira without a wig though! We all know about Moira and her precious wigs! I ordered this one from Amazon to top off my Moira transformation.
Stevie Budd: My daughter Avery didn’t love wearing the Stevie wig but she was adorable as the character. The flannel shirt, jeans and shoes were all her own clothes. I ordered a wig from Amazon to recrate Stevie’s long dark wavy hair since Avery has short red hair, lol. I drew her a Rosebud Motel sign, and threw on a Stevie name tag. Easy Peasy.
Alexis Rose: She is has to be my favorite on the show! After all, she is the character that gave us “Ew, Daviddd!” My daughter Quinn dressed up as Alexis and got into it! Alexis is veryyy boho, which luckily is a style I love too, so we were able to pull that whole costume together with items we already had. We used a strapless white flowy dress, a tan boho bag, ankle booties, big sunglasses, a floppy hat, and of course a cell phone!
David Rose: David’s style is veryyyy partifular so I googled some of his outfits and decided to copy his lightning bolt t-shirt. My son Jack already had a plain black shirt to start. I cut 3 different sixed lightning bolts out of cardstock and traced them around the neckline, then colored them in with a white paint pen. He wore a pair of black leggings that were my daughters, black loafers and some white sunglasses.
Johnny Rose: You can’t be Johnny Rose without getting those eyebrows right! My husbands are pretty full, but not like Mr. Roses, (because, whose are) so we ordered some bushy eyebrows and had him throw on a suit with a flashy pocket square.

Halloween 2020
Little Red Riding Hood & Company
Costume Number one of THREE!
Little Red Riding Hood & Company

This costume was a simple DIY.
My daughter Avery stole the show as the poor old grandma who gets eaten by the big bad wolf. She was waving her DIY cane around at the “young’ns” lol. For her costume, I glued a large piece of white fluffy fabric onto an old winter hat and twirled the back into a bun. I also glued white cotton balls all over the front to mimic tight white curls. For her glasses we punched out the lenses of an old pair of sunglasses, threw on the polka dot bathrobe and VOILA! Little old grandma!

Avery lovingggg her role as the little ol’ grandma
DIY list: Wig, glasses, cane

These goddamn youths… :-)
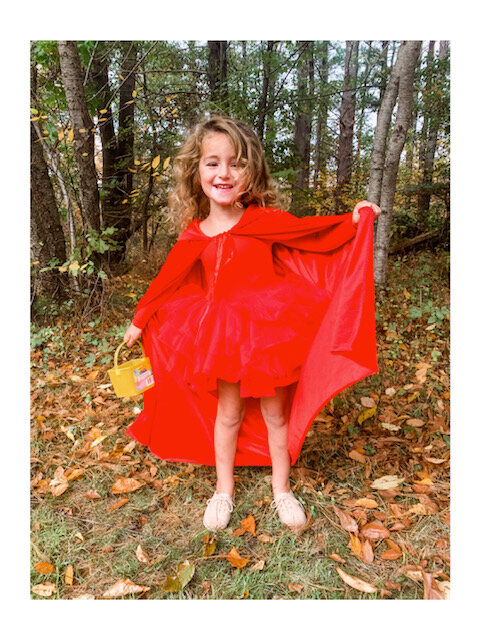
Little Red Riding Hood
Miss Red already had a red cape and a red tutu, so she was set from the get go. No DIY’s needed here :-)
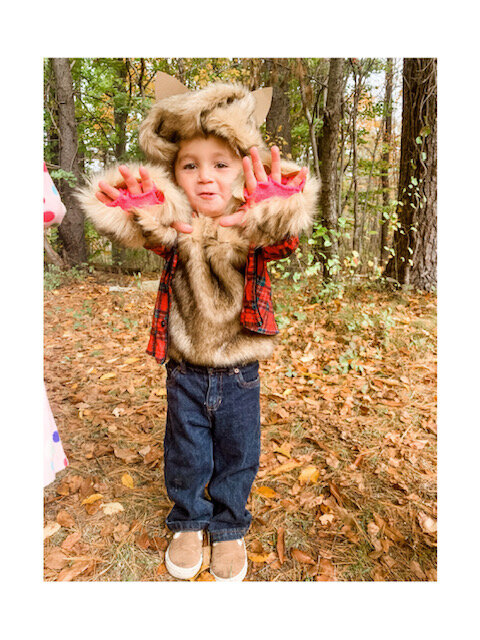
The BIG, BAD, Wolf
DIY List:
Furry gloves
Furry chest
Wolf hat
Wolf tail
My littlest one loved being the BIG and BAD wolf, as you can see! He got to work on his roarrrr. For his costume I DIY’d a few things.
His furry little chest. I bought a cheap remnant of furry fabric from the store and glued it onto an old white undershirt and threw on a flannel PJ shirt over it.
His furry paws. Those were gloves that I cut the fingers off and glued the matching fur onto the tops and palms. A hot glue gun really is the Halloween DIYer’s best friend.
His wolfie hat. That was a tan winter hat that already had dog hears on it! I hot glued (again) the matching fur on to the hat. Once the fur was on it you couldn’t see the existing dog ears because the fur was so fluffy. I added longer ears I cut out of brown cardstock so they would show up a little better.

As you can see they had a blast with this one!

Everyone really getting into character!
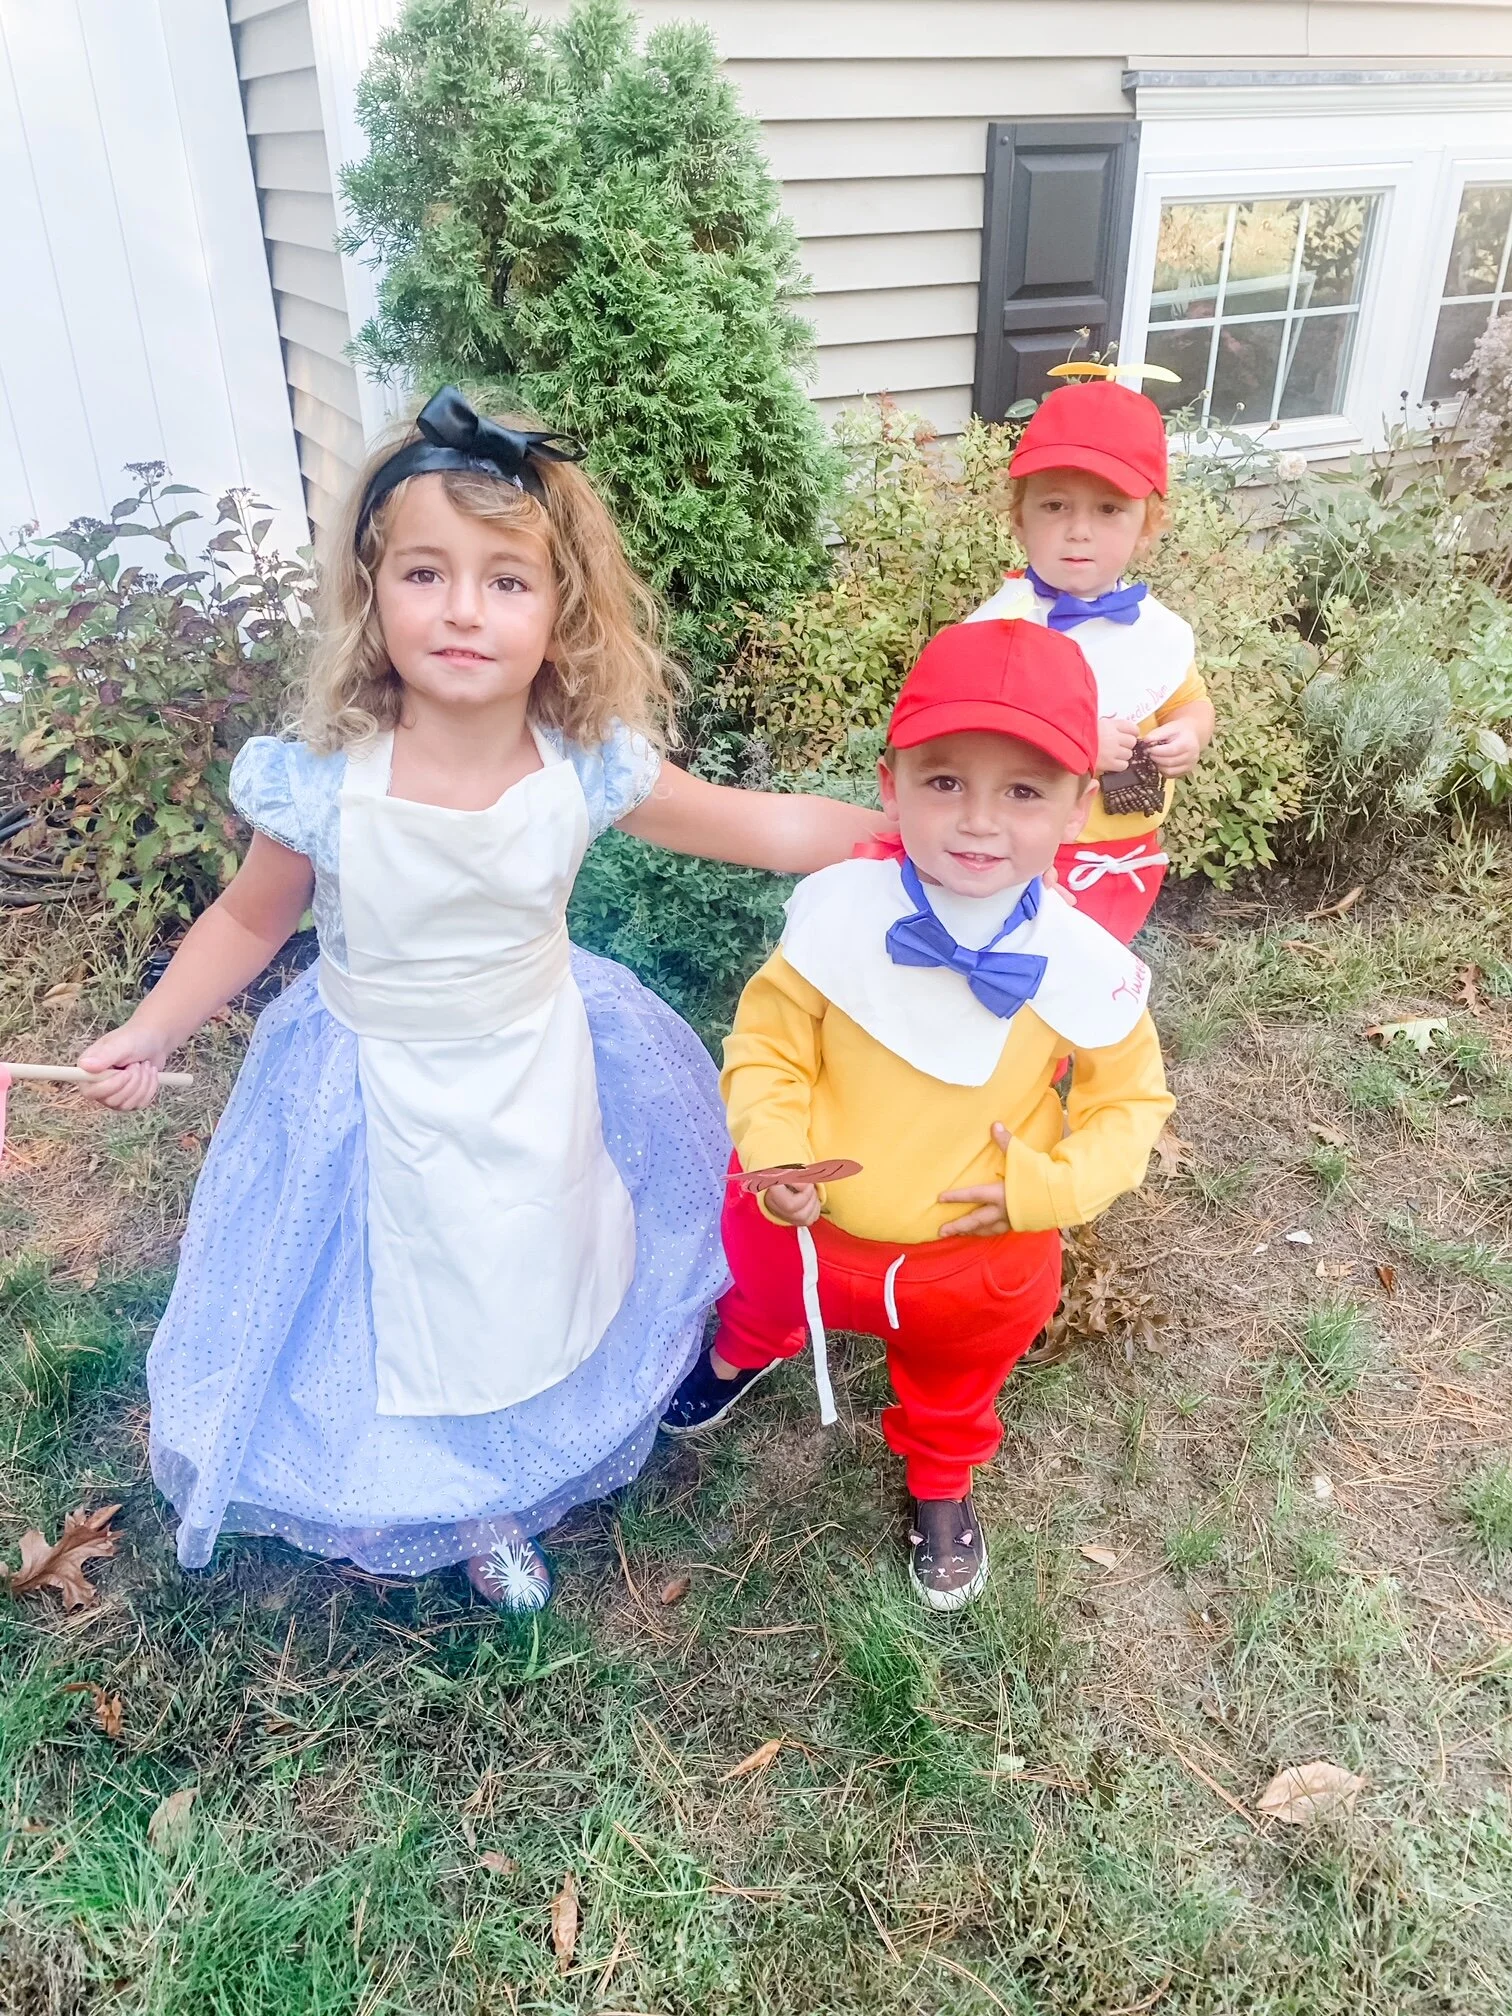
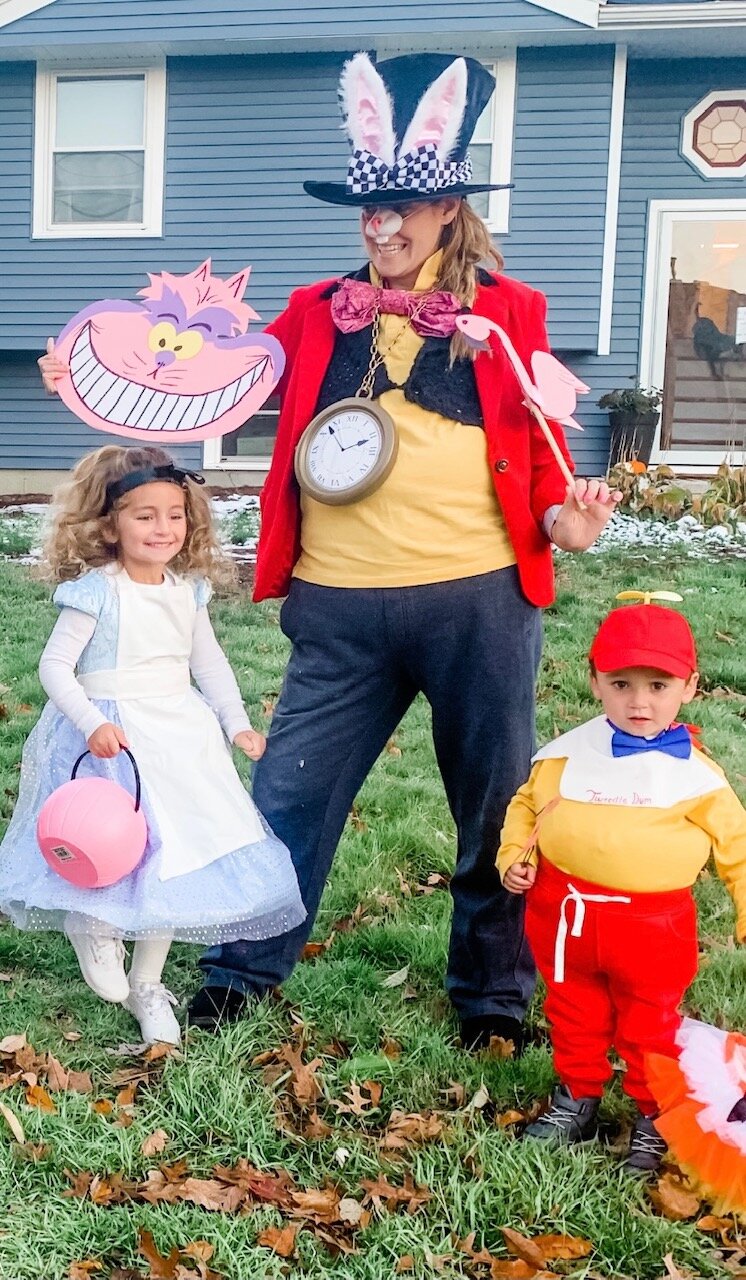
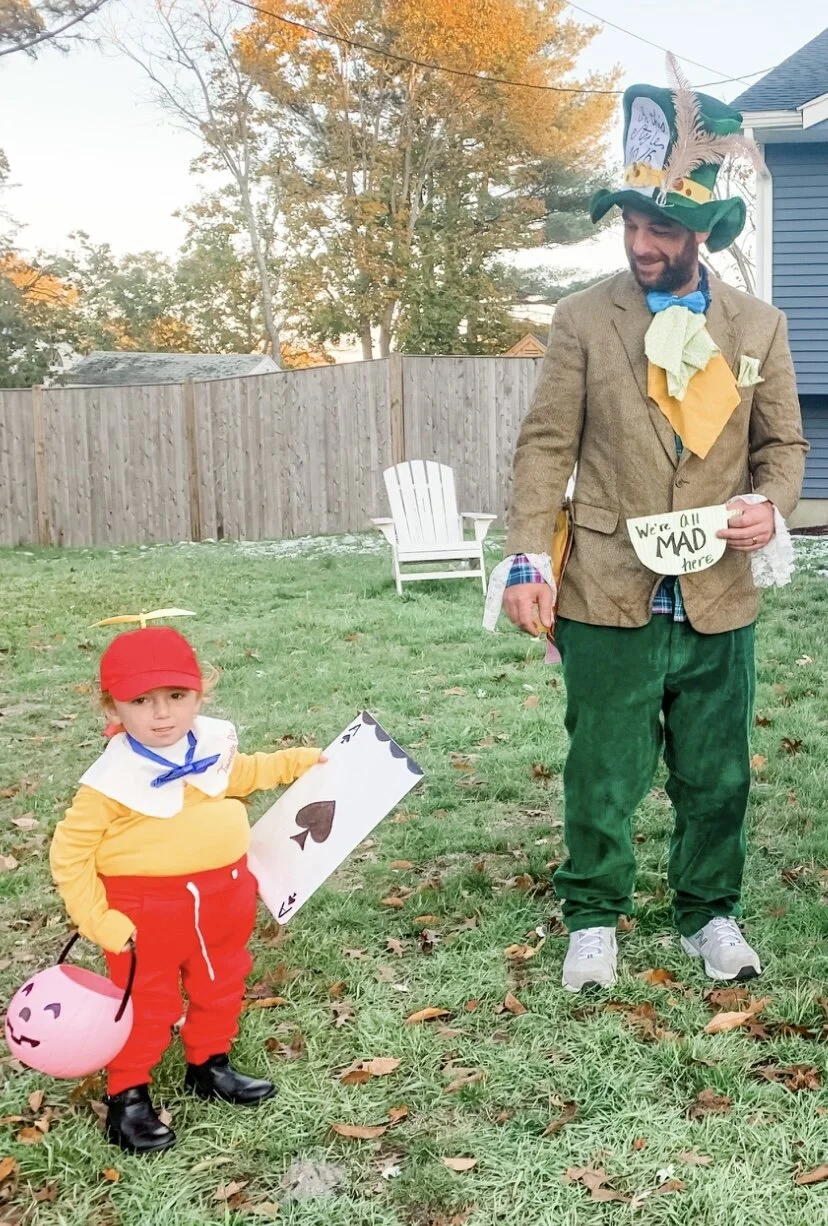
Family Halloween Costume Alice in Wonderland
It all begins with an idea.
We’re all mad here!

“We’re all mad here!” is the perfect quote for our family! 3 little kids 4 and under makes a wild household so Alice in Wonderland was a very fitting costume for our crazy crew! Costume/DIY details listed below


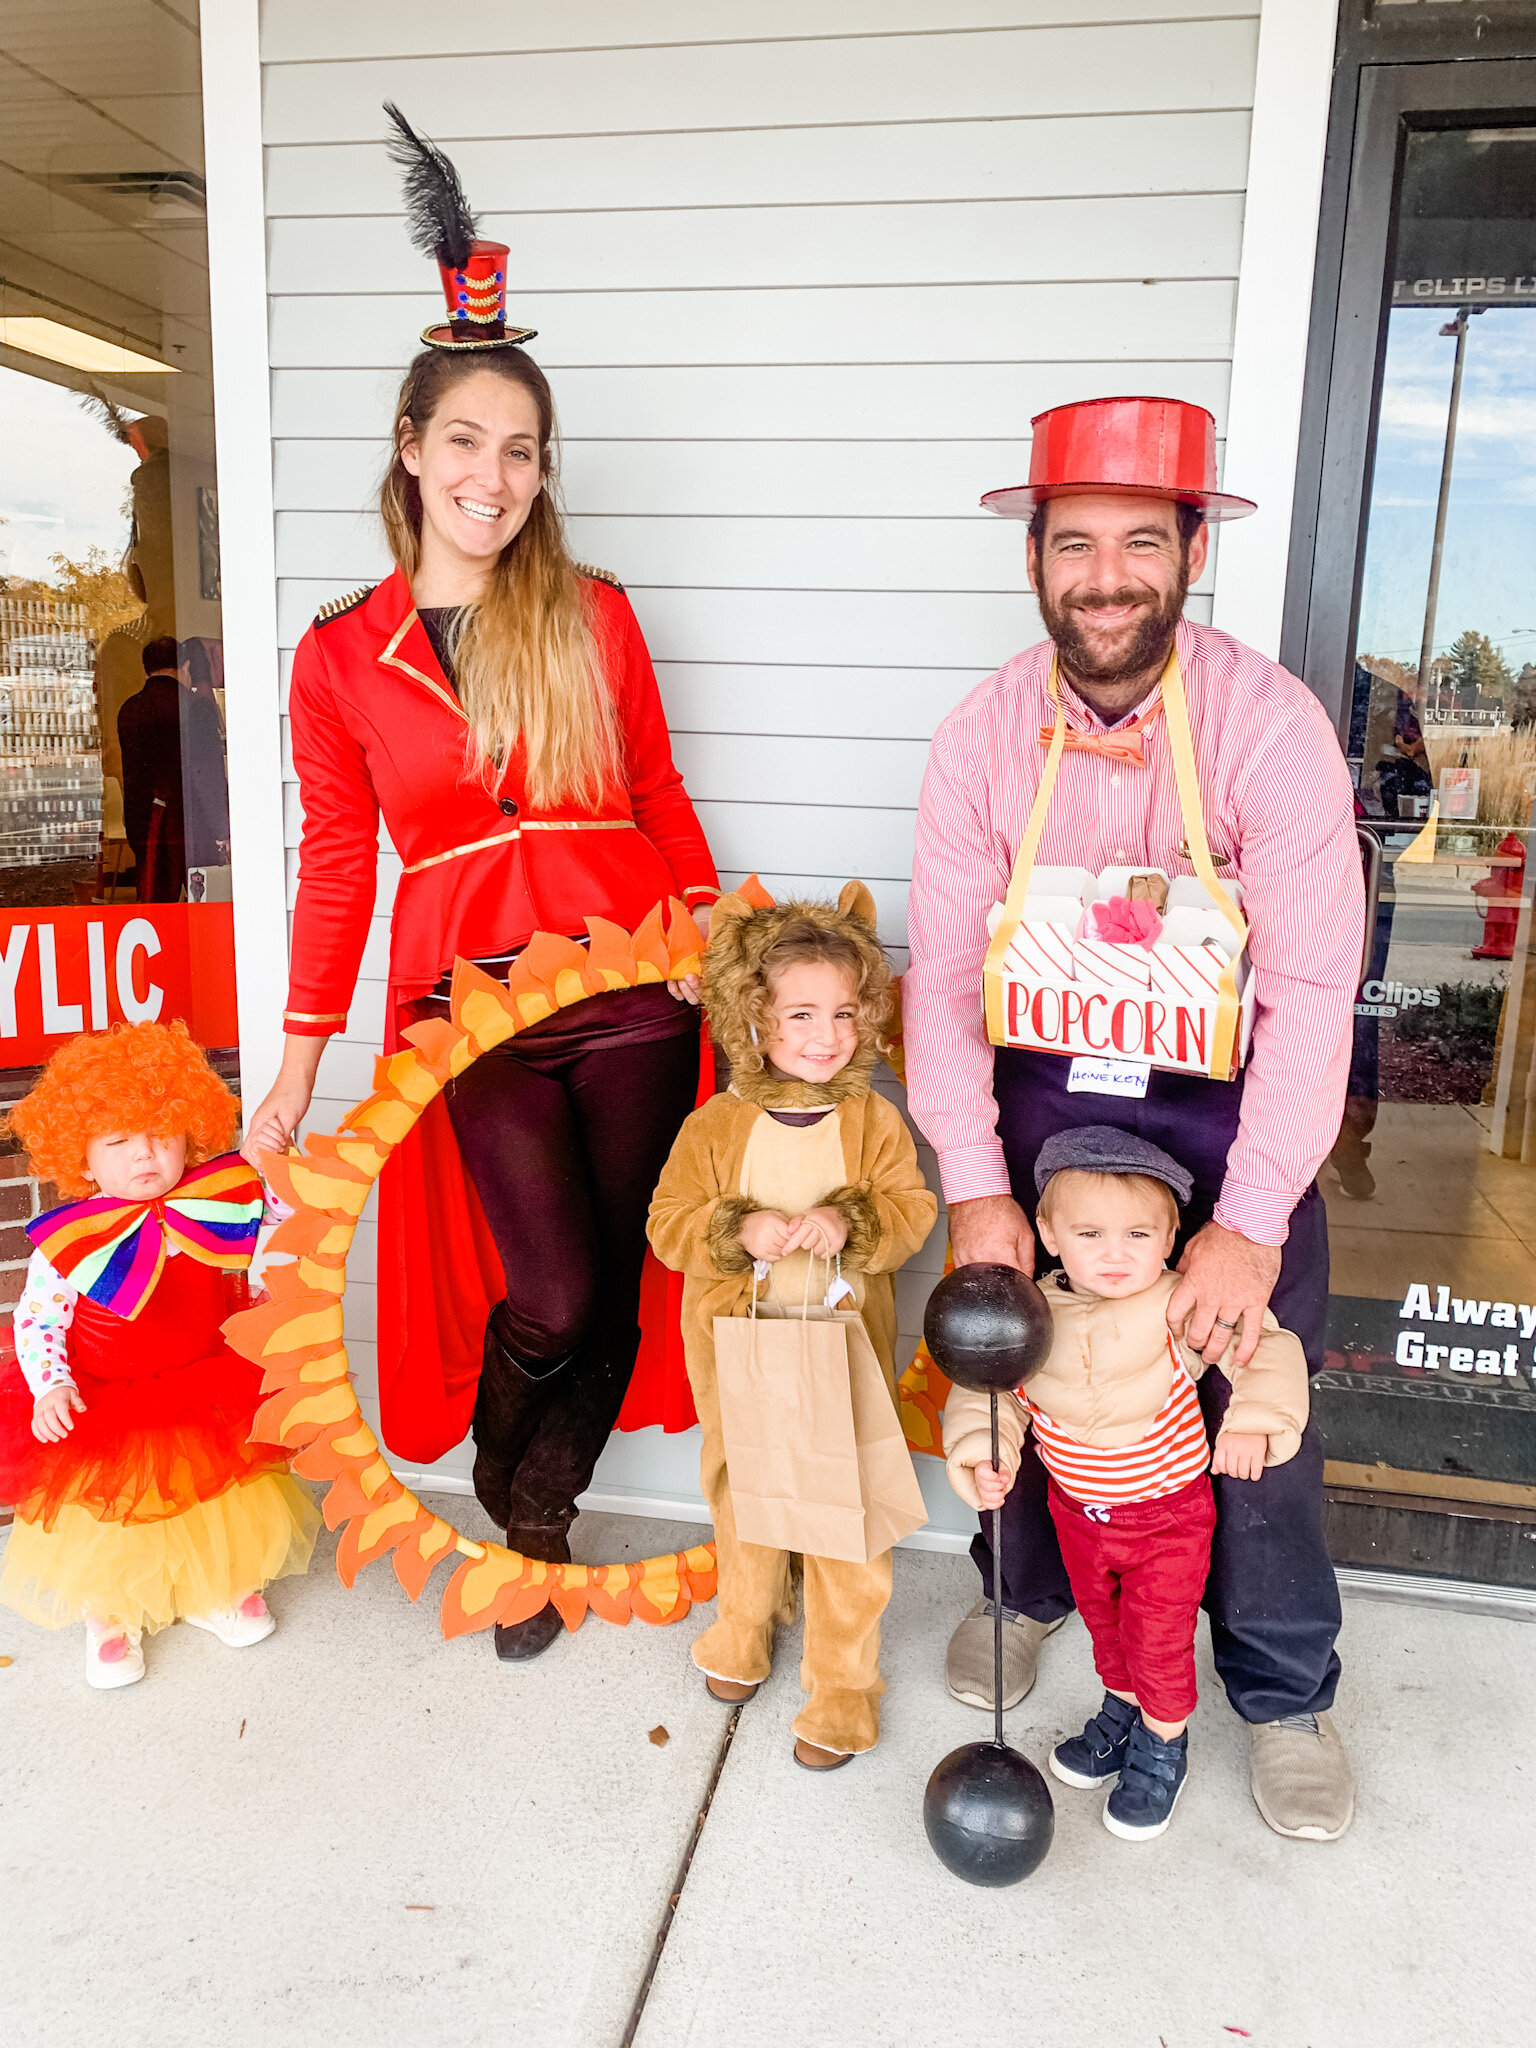
Halloweeeeeeen - Circus family costume
Big big BIG Halloween family over here. We always dress up in a family themed costume.. and usually multiple times. These are some of our family costumes from last year (2019).
First up: The family circus!

Our circus costume had: the strongesttt man in the worlddddd, the popcorn concession man, the Ringmaster with her ringof fire, the lion who jumps through the flames, the redhead clown, and the fortune teller!

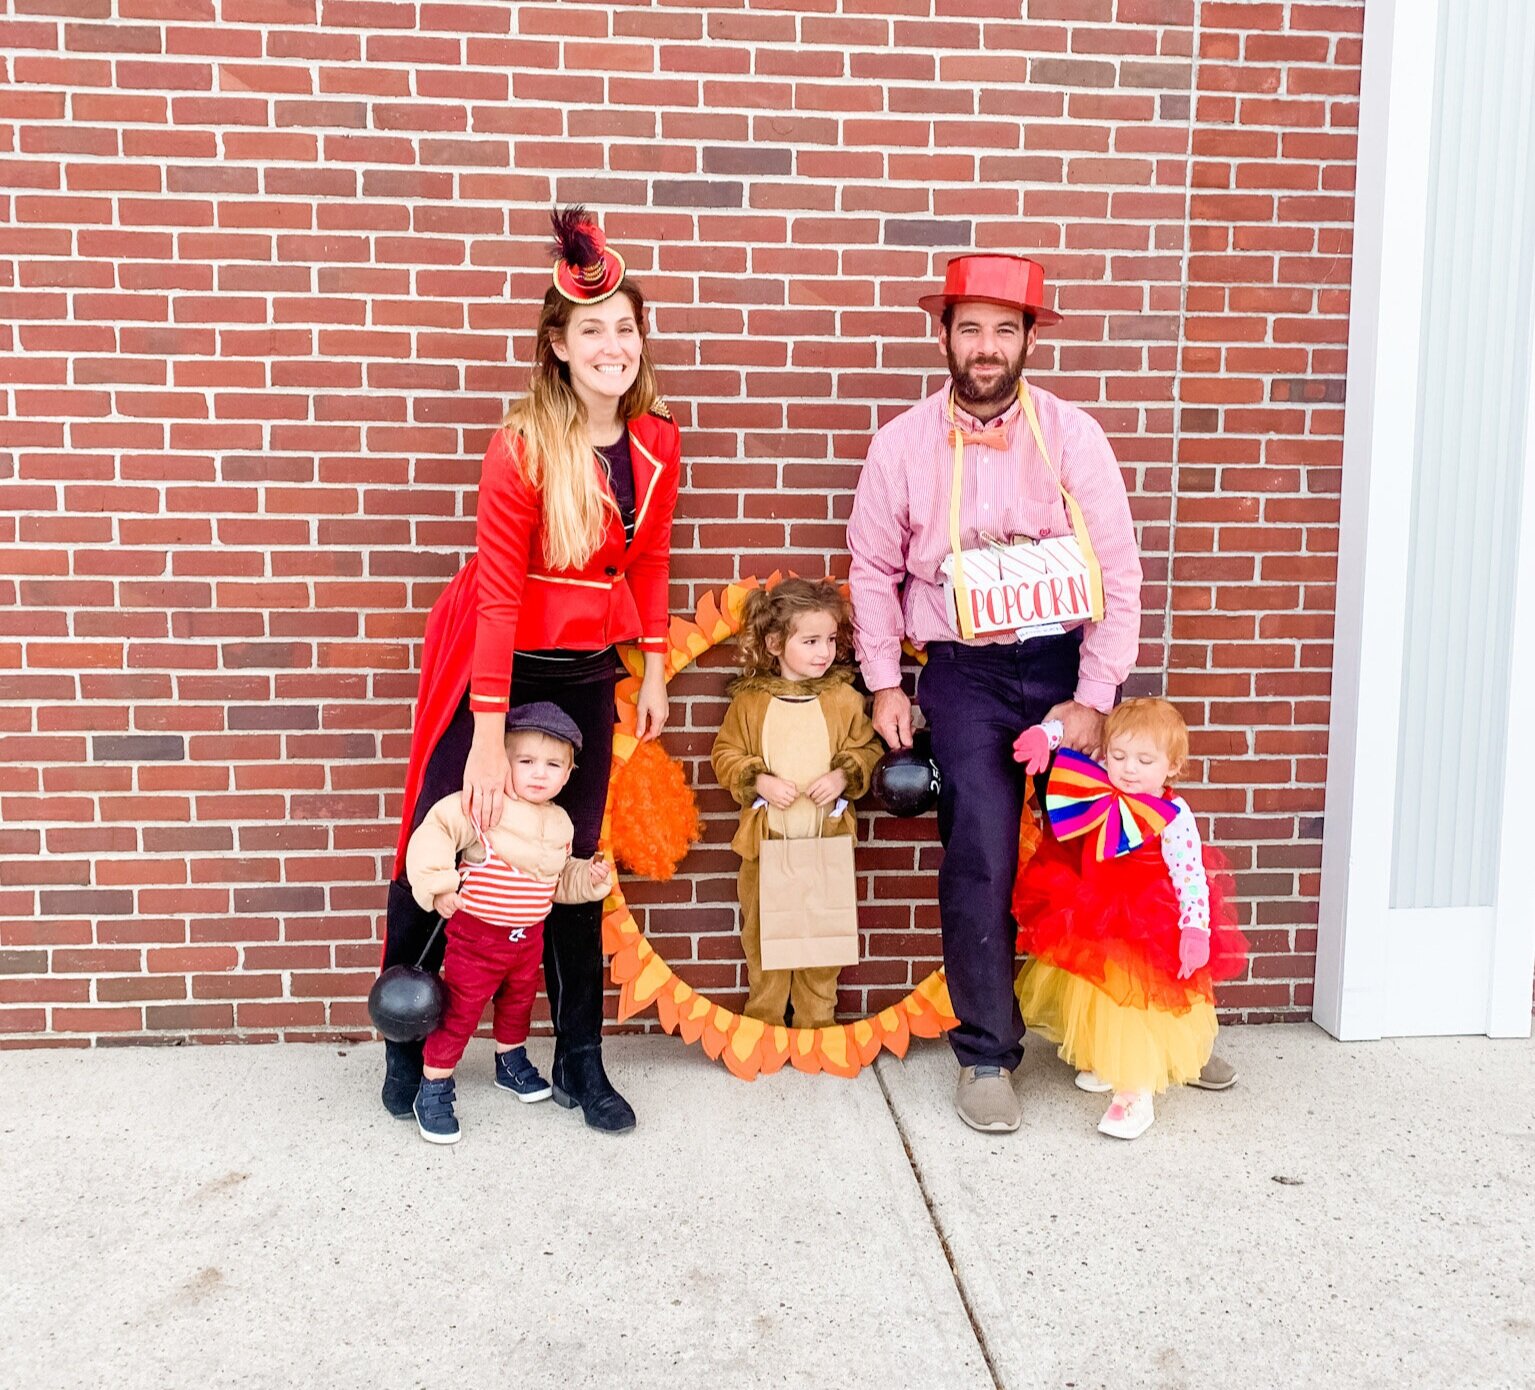
My little clown did not want to keep her wig on, and the strongest man broke his weights… family photos are hard

already dipping into their snacks :-)
This costume was really fun to make! I DIY’d pretty much all of it, with the exception of the lion costume and the muscles on my strong man (I am NOT a sewer).
For the clown, I used my oldest daughter’s dress up clothes-> a red tutu dress from iloveplum, that she still wears, an old yellow tulle skirt and polka dot tights (that you can’t really see) but it gets coldddd around here on Halloween. #newenglandproblems. Speaking of cold- I had to make sure the clown would be warm enough to trick or treat all night, so I made sure she had multiple layers. I used an old white onesie that I painted bright colored polka dots with puffy paint and found a pair of hot pink gloves we had on hand.
For the Ringmaster: I bought a cheap red coat off amazon and added the long coattails with red fabric I found at Joann’s fabric. I added gold ribbon trim to the coat to give it some extra circus pizazz, threw on a apair of my black leggings (I have about 5 billion pairs) and topped it off with a cheapy hat I found at party city. My ring of fire was just orange and yellow felt peices hot glued to a hoola hoop.
The lion was a costume I found off amazon, but I did make her a little fluffy headband with ears out of an extra peice of faux fur fabric we had lying around.
Popcorn concession man: I used an old amazon box, wrapped in white paper and glued, paper pocorn boxes to the inside so they would stay up right while we trick or treated. The strap around his neck and waist is just a yellow ribbon I attched to the box. His red flat brim hat is also homemade from an old amazon box. Gotta do something with all those extra boxers we have lying around. I found a tutorial here: and spray painted it red to go with the theme. His outfit was navy blue dress pants and a striped button down that he already owned.
For the strongest man: I bought his muscle shirt off amazon. My daughter had a red and white striped tank top that I thought was the right look, but was very girly. I cut off the ruffles around the neck and made a deeeep circle neck, so his “muscles” could pop out. Red pants, and old newsboy hat were items already in his closet. His 250 pound dumb bells were another DIY. I got a dowel and 2 foam circles from a craft store, spray painted them black and glued them togerher. I wrote the weight on the balls with a white sharpie.
The fortune teller was a completely last minute addition, since my mom was in town during Halloween. It was made completely of items out of my closet, a flowy maxi skirt, a boho sweater, a scarf tied around her head and one around her wasit, tonssss of necklaces and a red bouncy ball from our yard.
The whole costume was one of my favorites!!!
NEXT UP:
Toy Story!!

Halloweeeen Toy Story 4 family costume
Toy Story 4 Family Halloween Costume DIY
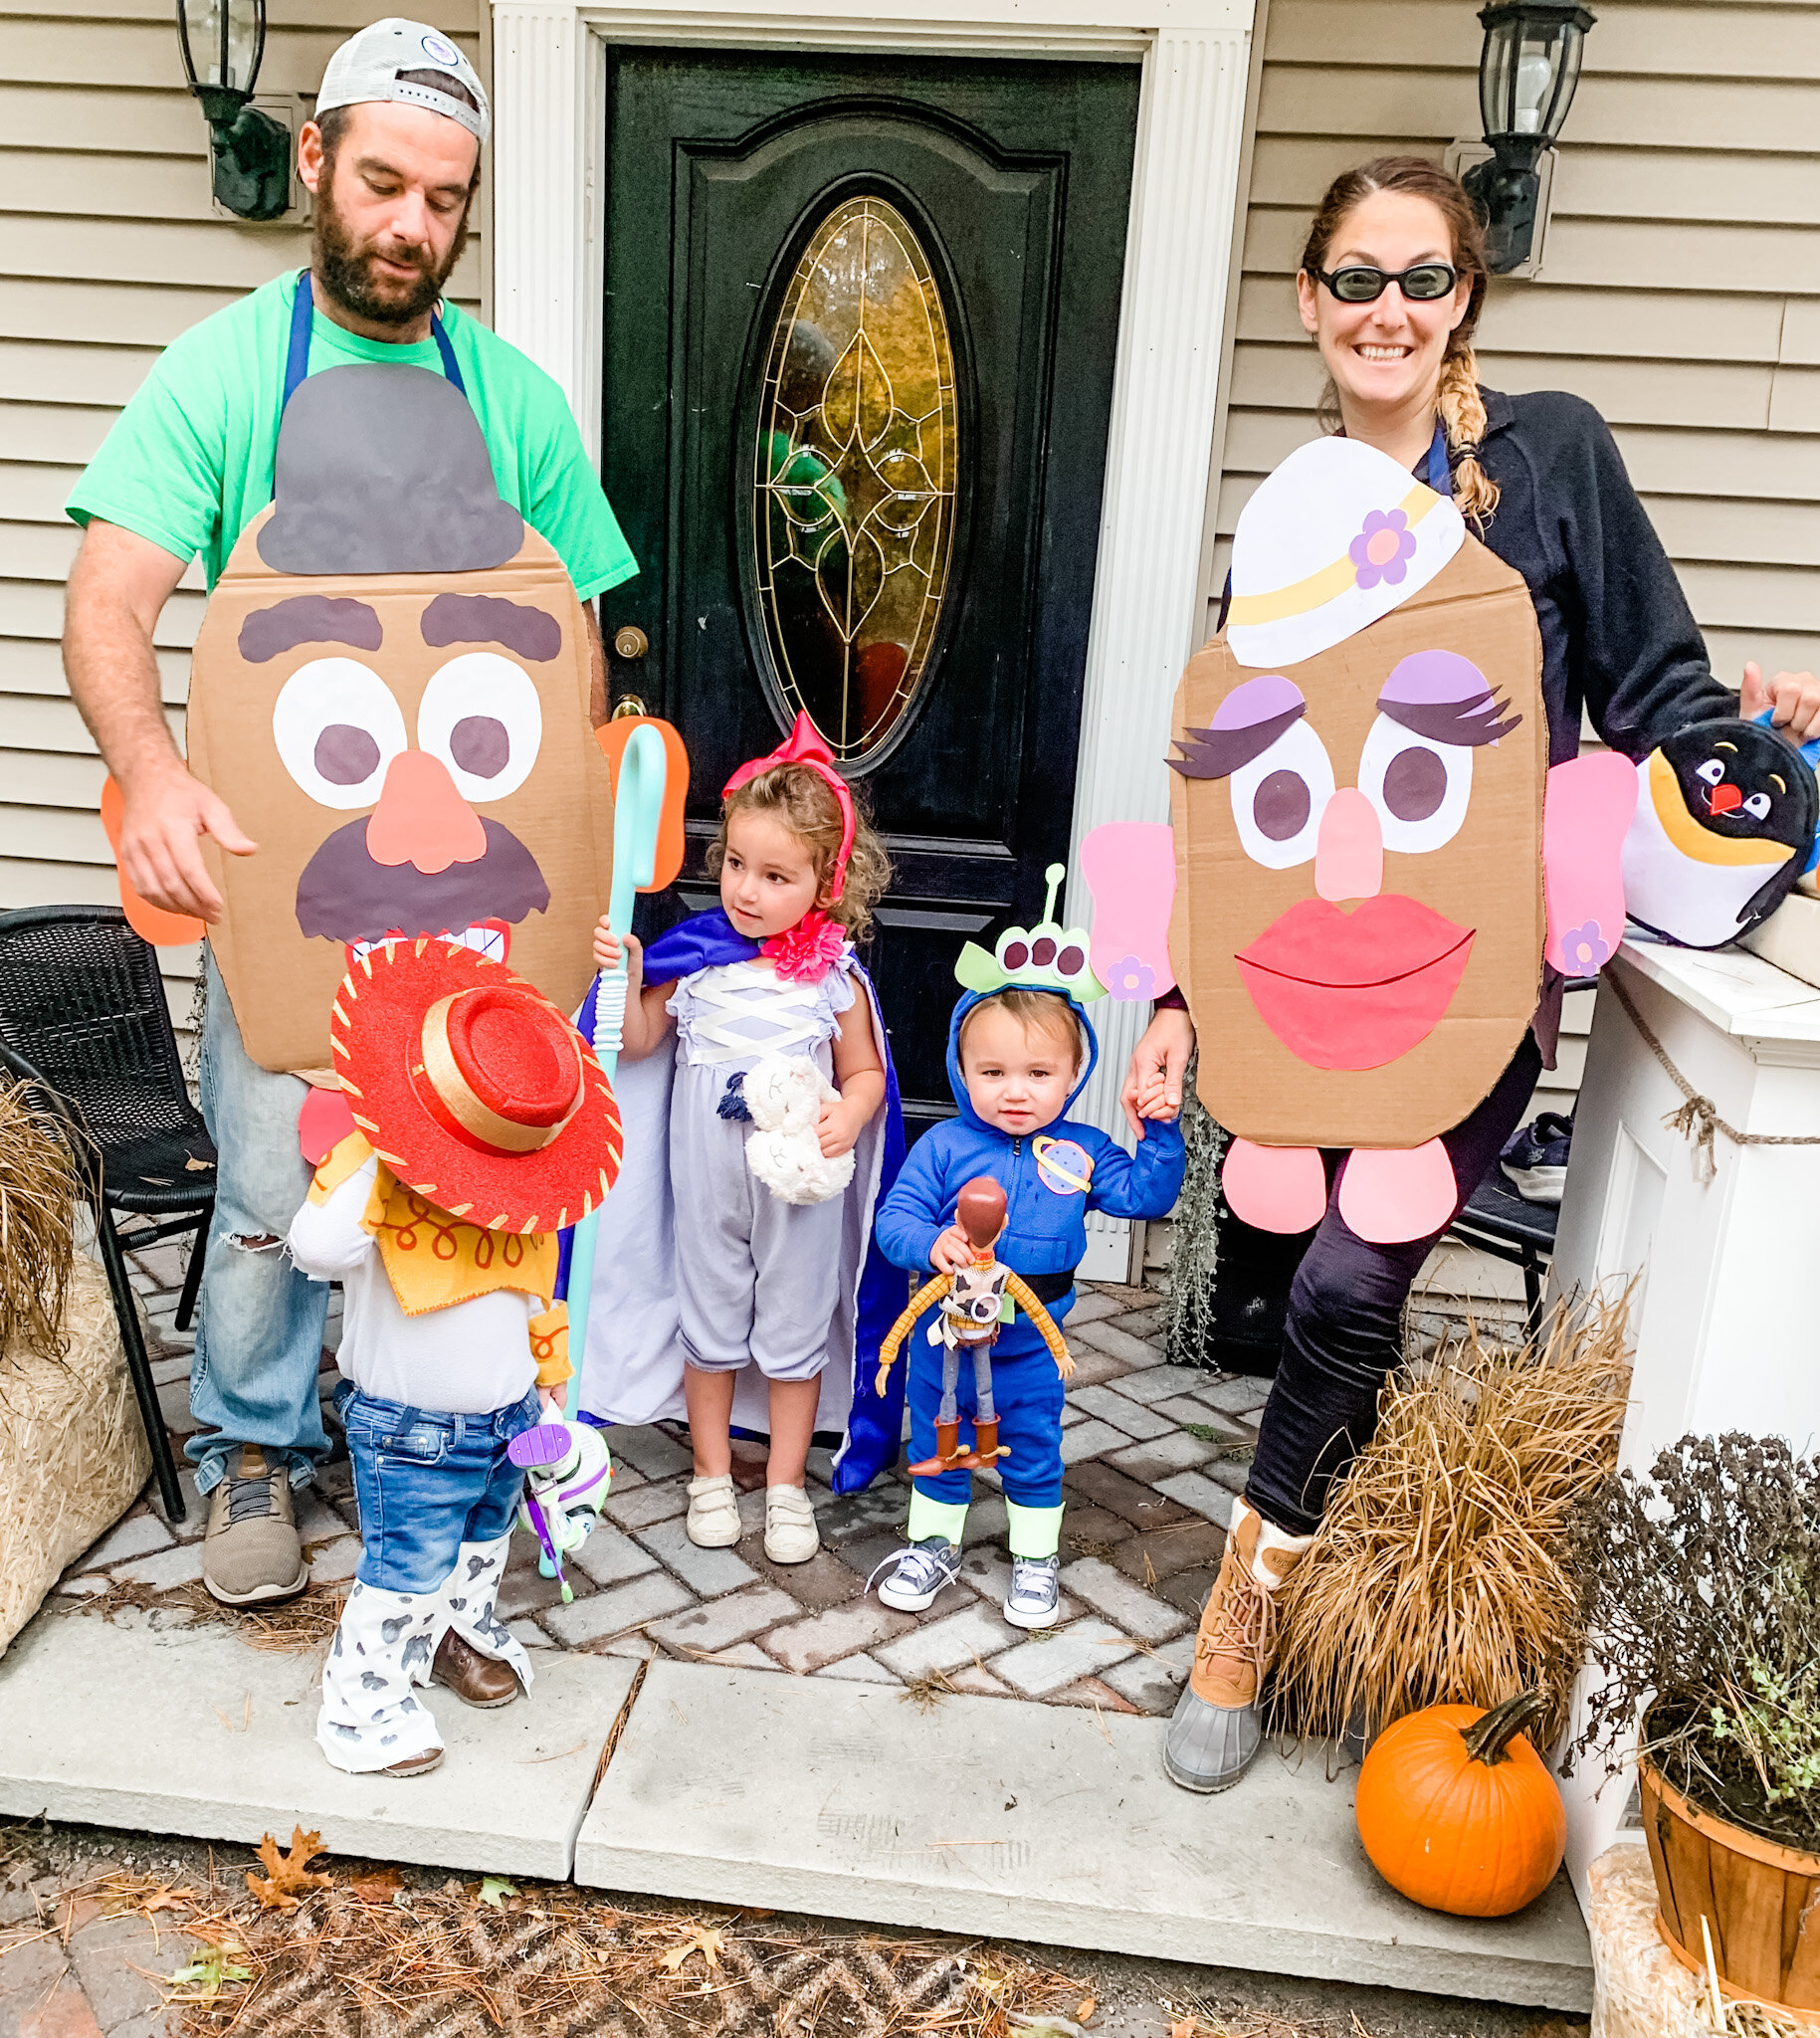
Avery losing her hat…
To infinity andddd.. my foot!
#iykyk
October 2019 is right around the time my kids became obsessed with Toy Story 4, probably because we had just got disney plus and thats allllll we watched for days on end, so it seemed only natural to make a Toy Story 4 themed family costume when we were told at the last minute Quinn (my oldest) needed a costume for her cheerleading practice.

impossible to get a family picture with everyone looking
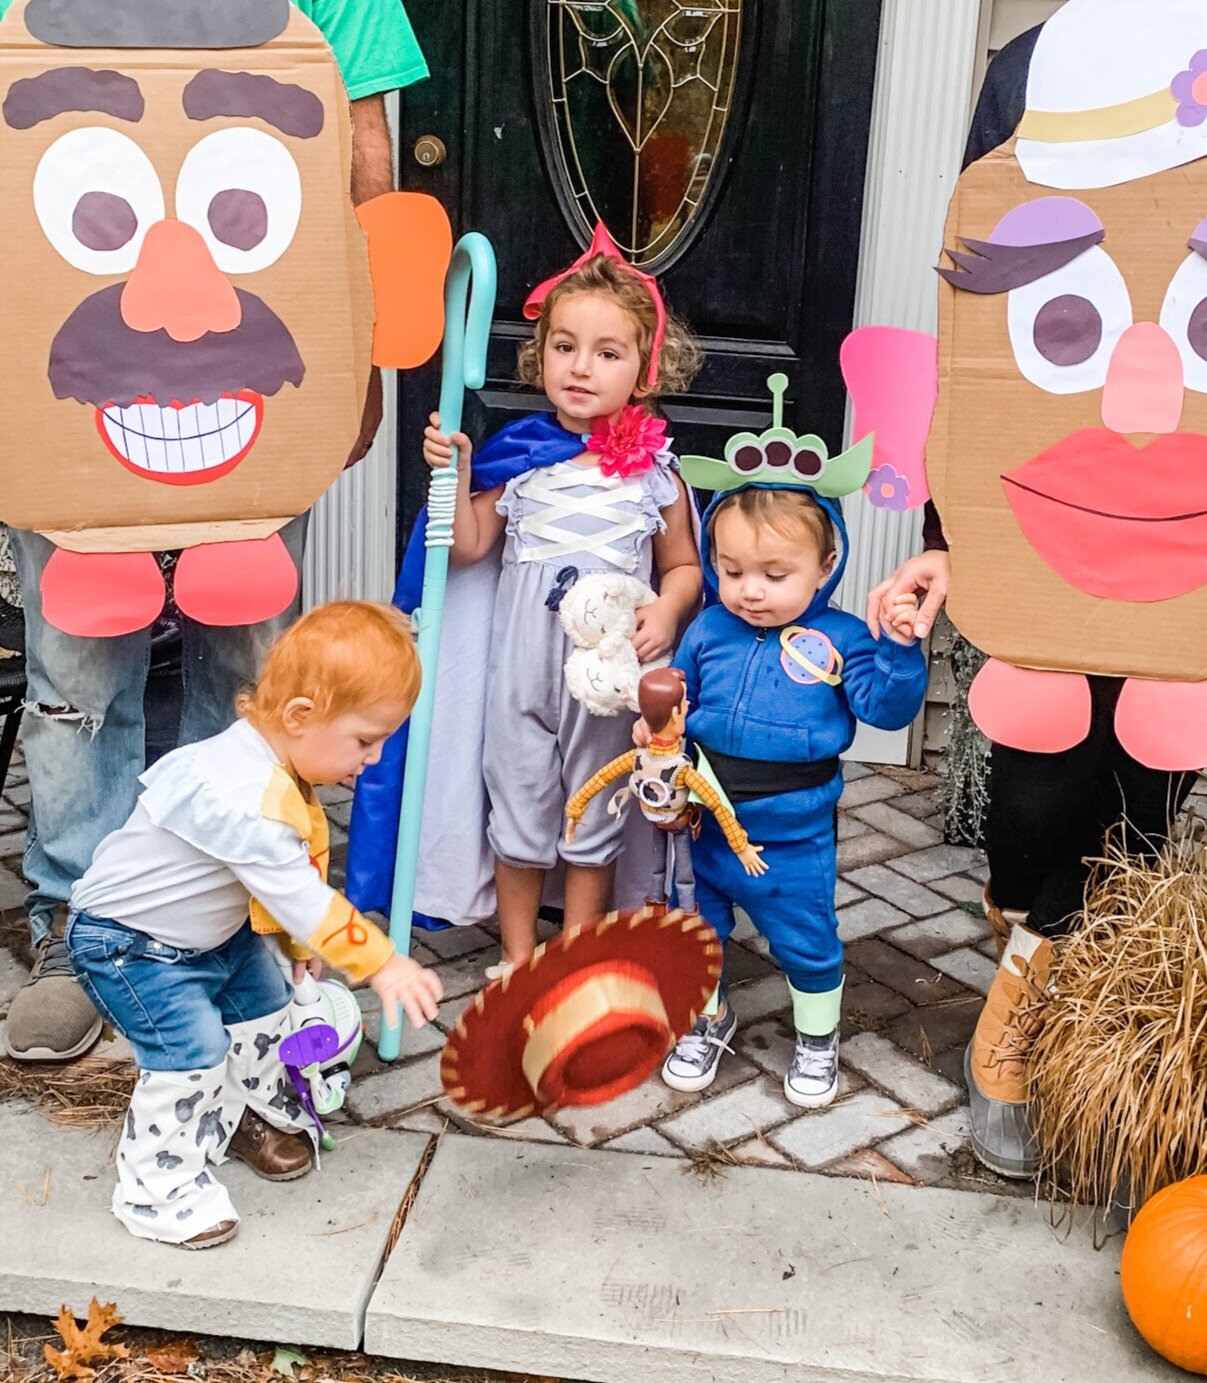
Like I said above, this was a last minute DIY for my daughter’s sports practice. For Mr. & Mrs. Potatohead I used old amazon boxes (again, lol! I swear they come in handy) and used construction paper we had on hand to make the faces. I had to google their pictures to get a good idea of what they actually looked like in the movies. I glued some ribbon on the top and voila! done!
For Jessie: we already had her awesome cowgirl hat as a dressup accessory which made pulling that costume together pretty easy. I used sharpie marker to draw cow print on white frabic and glued the fabric onto an old pair of jeans right at the knee to make them look like chaps. For her yellow bib, I cut a neckhole out of a sqaure peice of fabric and draped it over her shoulders, then colored the red swirl pattern on in red sharpie. The white shirt, jeans, and boots are all just clothing items we already owned.
Bo: I thought this costume was gonna be a little tougher but luckily my daughter had a romper from Easter that worked great for her bloomers and corset; I just glued ribbon to the top in a criss cross pattern to make it look like a corset. For her cape we had an old mismtached pink polka dot pillow case laying around so I hot glued that to the inside of a dark blue peice of fabric, attached a string at the top to make it a cape and glued a pink flower. I glued bright pink ribbon to a headband and added a bow to the side. Her little sheep (Billy, Goat, and Gruff) are actually an old pair of sheep slippers that I sewed together.
The Alien: My little man had a bright blue track suit (given to him) and it was sooo close to not fitting at all anymore that I was fine with gluing some fabric/stickers/decals/etc on it. I used lime green foam board bought at a craft store to make his alien eyes and antenna. Easy peasy. I googled the details of the alien and recreated the “pizza planet” logo on his chest.
For making this whole family cosutme in about 2 hours I think it came out pretty great!!